
Easy steps to go from zero to a Tanzu Kubernetes cluster on your home lab
Try out VMware's just released Tanzu Community Edition - A step-by-step guide.


Last week was a big week for VMware's Tanzu. VMware released the Tanzu Community Edition, a full-featured kubernetes platform that you can use to spin up and manage kubernetes clusters on public or private cloud providers.
In this post, I will walk you through the steps I took to get a multi-node Kubernetes cluster deployed on my home lab using VMware vSphere and Tanzu Community Edition. You can use the same steps to try out Tanzu.
Hardware
I am using an Intel NUC 10i7FNH purchased on eBay. The processor is Intel Core i7-10710U (up to 4.7 GHz) with 6 cores.
Here's a video of my installing the 500 GB SSD and 32 GB memory stick in my NUC:
The 500 GB SSD is 970 EVO Plus NVMe™ M.2 The memory stick is a Crucial RAM 32GB DDR4
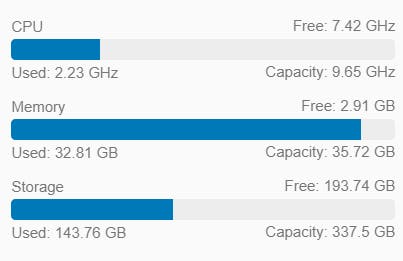
You may want to add more RAM (and perhaps storage) than I did because with a 2 node management cluster and a 2 node workload cluster, it uses a lot of RAM:
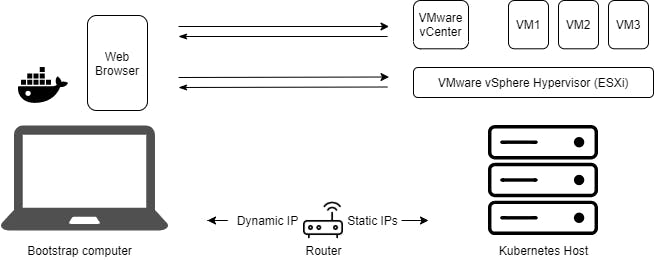
You will need a bootstrap computer with a connection to the internet to download ISOs, OVAs, container images, etc, and a private connection to your ESXi host. It helps if its running MacOS or Linux. If you are using a Windows 10 PC, you can easily enable the hypervisor in Windows and run Linux side-by-side on it. (I constantly switch between a Mac and a Windows PC with WSL2 running Ubuntu.)
Here's what your set up would look like when you're done:
Network
At home, you probably have a router (or modem+router) that acts as a DHCP server assigning IP addresses to your phones, computers and other devices. Log in to your router and set your DHCP range to a subset of your subnet range. Ensure they are not completely identical.
Installing ESXi
- Download VMware vSphere Hypervisor (ESXi) .
- Use Rufus to make a Bootable USB stick from the ESXi .iso file.
- Stick it in the USB port and start the machine. It should boot into the USB stick. You can follow the instructions on screen to install the Hypervisor.
Configuring the hypervisor:
- Configure ESXi to synchronise time with an NTP server. Also, configure your bootstrap server to synchronise with the NTP server. This will be handy later. If you are using a mac, it's probably already synching with time.apple.com. On a Windows PC the default NTP server is time.windows.com.
- Configure it to use a static IP address (i.e. outside the DHCP range) within the subnet.
vCenter
- Download the vCenter Server Appliance ISO file .
- Mount the ISO file (on your client bootstrap computer, not the lab)
- To install vCenter with the GUI, go to your operating system's directory in vcsa-ui-installer/ directory in the mounted directory and run the installer executable. While configuring vCenter, it is important to make a note of all the config parameters. The configuration may not work on the first attempt and it may need some trial and error. In most cases, you can use defaults. Create a table in say, Google sheets to list all your configuration parameters. Here are some pointers:
- Assign a static IP address that's within your subnet, just as you did with ESXi.
- Enable thin disk provisioning so you don't run out of storage space too soon. This does make disk usage more unpredictable, though - you may run out when you least expect it because it may give you a false impression of the amount of storage that is available, so keep an eye on disk usage.
- Configure vCenter to synchronise time with ESXi
You can now log in to vCenter: Go to your vCenter IP address in your browser and launch vSphere Client. Remember to use the full username, i.e. username@domain, eg, administrator@vsphere.local
Tanzu Community Edition
Download and Install Tanzu CE
- Ensure you have the latest version of kubectl
- Download TCE here for your local linux bootstrap machine.
- Untar the downloaded file:
tar xzvf tce-linux-amd64-v0.9.1.tar.gz - Run the script to install TCE CLI:
cd tce-linux-amd64-v0.9.1 ./install.sh - Check if Tanzu is installed correctly:
tanzu version
Set up permissions for Tanzu
- Create a vSphere role for TCE to use: In vCenter client, go to Administrator > Access > Roles and create a new role with the following permissions:
| Object | Permission |
| Cns | Searchable |
| Datastore | Allocate space, Browse datastore, Low level file operations |
| Global (if using Velero for backup and restore) | Disable methods, Enable methods, Licenses |
| Network | Assign network |
| Profile-driven storage | Profile-driven storage view |
| Resource | Assign virtual machine to resource pool |
| Sessions | Message, Validate session |
| vApp | Import |
| Virtual Machine | Change Configuration > Add new disk, Add or remove device, Advanced configuration, Change CPU count, Change Memory, Change Settings, Configure Raw device, Extend virtual disk, Modify device settings, Remove disk, Add existing disk |
| Virtual Machine | Edit Inventory > Create from existing, Remove |
| Virtual Machine | Interaction > Power On, Power Off |
| Virtual Machine | Provisioning > Deploy template |
- Create a user that you can assign this role to. Go to Administration -> Single Sign On -> Users and Groups create a new user.
- Assign this user and role to your host, storage and network. In your Hosts, Storage and Networking views, right-click the main host, datastore and network respectively, select Add Permission and assign the user and role you just created. Select Propagate to children when doing this.
Make a template for the kubernetes nodes OS
- Download an OVA file that matches the OS that you want to run as Kubernetes nodes. You can download the OVA files here .
- In the hosts and clusters view in vCenter client, right-click on the host and select Deploy OVF template. Select the OVA file you just downloaded and continue to deploy a VM from the OVA.
- When the OVA is deployed, right-click the VM and select Template -> Convert to Template. (Don't start the VM before you convert it.)
Create an SSH key pair
- On your bootstrap machine, run ssh-keygen:
ssh-keygen -t rsa -b 4096 -C "your-email@domain.com" - When prompted for the file to save the key, you can press Enter to choose the default
id_rsa. Enter a password for your key pair. - Add your private key to the SSH agent on your bootstrap machine and enter the password.
ssh-add ~/.ssh/id_rsa
Deploy a standalone k8s cluster
- Start Docker on your bootstrap machine and make sure it can connect to the internet to pull container images.
- Start the Tanzu browser UI on your bootstrap machine to create a standalone cluster:
tanzu standalone-cluster create --ui - In the browser UI, select VMware vSphere: Deploy
- Enter your vCenter IP address, vCenter SSO username and password and click Connect
- Choose the 'Datacenter' (that's your host) and in the SSH Public Key field, paste in the contents of the
~/.ssh/id_rsa.pubfile that was created in step 2 of Creating an SSH key pair. - Select a small instance type under Development, a standalone cluster name, a static control plane endpoint IP address from the subnet. Leave the endpoint provider as kube-vip.
- Under the Resources section, choose the VM folder, the datastore name and host IP address that you configured when setting up the ESXi hypervisor.
- You can leave the default values in Kubernetes Network settings, disable identity management settings and under OS image, select the template image you created for the kubernetes nodes OS.
- Finally, review the settings and before deploying the cluster, study the CLI command equivalent. This command shows that based on your configuration above, the Tanzu standalone cluster installer has created a YAML configuration file, probably at ~/.config/tanzu/tkg/clusterconfigs/.yaml. This YAML file will be handy to make a config file for the workload cluster.
If you wanted to use Tanzu Community Edition with a public cloud provider, rather than vSphere, then you can skip most the steps above. You would only have to follow the steps in Download and Install Tanzu CE and Deploy a standalone k8s cluster. Instead of the vCenter SSO credentials in the first step, you will need to provide appropriate credentials for your account, for example, if you use AWS, you provide the AWS CLI profile which you create when you first configure AWS CLI on your bootstrap machine.
Instead of a standalone k8s cluster, you can also first deploy a management k8s cluster to help manage your workload cluster. This leverages Cluster APIs to deploy and manage your application workload cluster in a declarative way.
Using your kubernetes cluster
To actually use kubectl to talk to kube-apiserver on the cluster, you will need the cluster config. kubectl takes its configuration from the ~/.kube/config file. You will need to get the vSphere k8s cluster config here. To do that, run:
kubectl config use-context <standalone cluster name>-admin@<standalone cluster name>
To verify that kubectl works, try using it to get details of resources on the kluster:
kubectl get nodes
That's it! You can, now, deploy workloads to your kubernetes cluster using kubectl.
The experience
You are bound to encounter some hurdles along the way. The Tanzu team have ensured that the Community Edition installation and usage is relatively simple, and its configuration parameters have default values that work. It's also easy to get Tanzu Community Edition working on public cloud providers. It is useful for developers to get familiar with Tanzu in small-scale or development environments. This further increases VMware's reach and influence among the developer community.
The story with ESXi and vCenter, on the other hand, is different. You will encounter errors and the errors aren't always self-explanatory. For example, a common problem that many find is that when installing vCenter the installation gets stuck at 80%, waiting for RPM installation to complete. This can get stuck at the same place for any number of reasons. To find the real cause, you will need to look at log files that can be cryptic and misleading. The vCenter documentation online isn't very helpful to resolve these errors.
The release of Tanzu community edition is a welcome step. It lets many more learners hone their skills in a hands-on environment and allows developers to run compute-intensive workloads and proofs of concepts in pre-production environments.